Showing posts with label Master Bedroom. Show all posts

Monday, August 26, 2013

Starting the Fun Part

Since we recently added a room to the house, we have a whole new room to decorate! It took us a while to figure out what exactly we wanted our master bedroom to look like. We decided to stick with a light grey color for the walls (Silver Birch by Glidden) and add some pops of color with fun accents, leaving the room itself fairly neutral.
 
The color pallet is grey, white, teal, and gold/brass. With a Crate and Barrel coupon we had, we went and bought this pretty pillow to bring some extra color to the bed. We also ran into the these beauties at the outlet one day and decided to pick them up. They definitely helped to tie in our craigslist modern dressers.


Trying to keep the color pops going, we went to Target and found some teal candles to put on our new candle holders. We also found a cute gold vase on sale, so we grabbed that too. Our plan is to pull in more gold, wood, and teal through picture frames and art. We got a custom brushed gold picture frame for Jon's nautical chart, so we are trying to find some others that have a similar look.

We are just getting started with the decorating, but we think we are on the right track and we hope that it will all come together soon.
 

Monday, March 18, 2013

Dressing up our Bedroom


Since we finished cleaning up the walls in the master bedroom, we wanted to start making more aesthetic improvements to the room (the mismatched curtains and old comforter just weren't cutting it anymore). First thing I wanted was new bedding. The comforter we had was Jon's from college... enough said. I wanted something floral and modern, which proved to be hard to find as everything floral we looked at seemed a bit dated. I finally found this beautiful bedding from West Elm. Once I brought it home, Jon thought it was a bit too girly, and we were both concerned with the white backdrop getting dirty quickly. So, before we went to return it, we checked online to see if anything new came out that we would want instead. And it did! This duvet was much more "us" and was exactly what we were looking for but couldn't find before. It is definitely one of my favorite things about the room now.

 (that picture is showing off a little sneak peak of an upcoming post)

Another big upgrade we made was finding some beautiful mid century dressers. Jon found a set (two dressers, nightstand, and headboard) on Craigslist and once he sent them to me, we decided to got that night to check them out in person. They had some slight wear and tear but overall you could tell that they were loved and gently used so we snatched them up after a little price negotiation.


The (vintage) Modern furniture is tall enough to fit over the baseboards which allows us to get them close to the wall, something our old set wouldn't do. Overall these guys take up about 4" less of floor space, a big deal in a small bedroom. 


We re-used the mirror from our old dresser and decided to hang it vertically instead of horizontally like we had it before. It matched the mid-century look better. And that frees up more wall space to add some decorations!


The only downside is that the set came with one nightstand instead of two. We have found a few online that looked similar, and eventually may buy a matching one. But for now, Jon is using the night stand from our previous bedroom set. We are still making some adjustments on the headboard, lighting, decorations, and curtains which we will be sure to update you on soon! 

Friday, December 7, 2012

Adding a Room to the House

OK maybe that title is a little drastic, we didn't technically add a room on the house. But, man! It sure does feel like we did! Our master bedroom has been a mess from day one. So bad that outside of sleeping in it, we did not want to spend any time in there. It had it all: wallpaper (missing in spots) that had been painted over, holes in the plaster, cracked ceiling with bad repair jobs hanging down, electrical sockets so used that plugs would just fall out of them. When we first moved in we thought we would easily remove the wall paper and paint and things would look great. So we went at it armed with putty knives.

That's us the first week we owned the house, oh how happy and naive we look! After putty knives proved ineffective in removing the wallpaper, we moved on to credit cards, and then to other projects that where easier and quicker. Every so often one of us would come up with a new idea on what to do about it (wallpaper over the current wallpaper, wood paneling, drywall... all got suggested). Until finally, almost two years later, we decided we should give it another try. This time armed with razor blades and hot soapy water we were able to remove all of the wall paper in about a weeks time.
 
(Please disregard the un-made bed, although it is the least of concerns in this pictue.)


The plaster that was behind the wallpaper was not much better looking. Cracked, pitted, and water-stained was not really what we wanted the master bedroom to look like. But after another week or so of plastering, sanding, and priming the walls with Killz we're not looking to shabby.
(Lots of small patch marks, this is round 2.)
 

The ceiling got the same plaster, sand, and Killz treatment along with a fresh coat of Killz ceiling paint. We had picked out a greenish color that we both loved but after two coats on the walls we decided it didn't work as well in the room as we had hoped. So we ended up with Silver Birch by Glidden. It's a nice soft grey that we think will look great as we introduce more accents to the room.

 
One thing we did in this room during the painting prep that made a world of difference was caulking around all the base boards, windows, and doors. It really cleaned up the walls the extra little bit. Now we are basically left with a blank slate, but at least it feels like a room! I can't wait to start bringing some accessories in to liven the place up.

Friday, November 16, 2012

Closet Organization

One thing that we never really organized when we first moved in was our up stairs closets. We have a decent sized closet in every bedroom, and Jon's guitar room actually has two closets. One of which is rather small, and another that was so big we knew right away it would be mine (duh). With the exception of these two that we actually used for clothes, the rest of the closets where filled with random boxes that we still hadn't gone through.


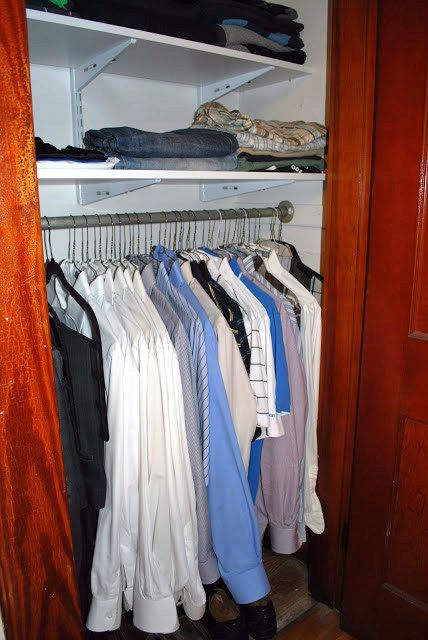
One day Jon randomly decided that the tiny closet he was using just wasn't cutting it. So he cleaned out the closet in our master bedroom and found homes for the miscellaneous items hoarded inside. Once it was empty we remembered why we hadn't used it. First off it was filthy, but that was easy to fix. Secondly, unlike the rest of the closets, it was an odd figuration. It was one bar... one really high bar. That's it. Not the best use of space.


So, Jon took down that bar and removed the boards that were supporting it. However when he removed those boards  he also created a nice sized hole in the back wall. It turned out that the boards were not attached to the studs properly, and instead were just nailed into the lathes of the horsehair plaster. So when Jon pried them off, out came a couple of strips of lathes- plaster and all. Jon cut a piece of drywall to fit the hole, screwed it into the studs, and used some patching compound to smooth out the wall.

The lathes and crumbled plaster.


Jon's handy work- new drywall patch.


Lots of patching then sanding the sucker smooth.

Once the wall was dry, we painted the inside of the closet with some left over paint. That cleaned the closet up nicely. We wanted to make this closet more space efficient, so decided to install the bar lower, that way Jon was able to install shelves above it to hold some folded items. The shelves we got from home depot; they are mix and match so you can buy just the pieces you need. They are really easy to install: level the top horizontal support, line up the vertical tracks with the studs, screw them securely to the wall, and you are pretty much done. The shelf supports just snap into the vertical tracks so you can move them or add a shelf later. Total cost of the project was around $100, with most of that spent on the shelving system. Definitely worth the price.